
I recently got an opportunity to do some testing with a Dell Powerstore 5000T all-flash storage array, so I thought I would share some of the notes I made during my testing, for the benefit of any DBAs who might be using one to deliver ASM disks to their Oracle databases.
This will be part of a series of posts that focus on the management of Oracle and ASM with Powerstore, so consider this post as a foundational topic. Nothing especially earth shattering, but some solid points nonetheless.
The Powerstore is Dell Technologies’ new midrange storage solution covering block and file. It replaces XtremIO, Compellent and most of the old Unity line. I am not going to dive too deeply into its features and functions in this post, but it is a great platform for supporting mission critical workloads such as Oracle and other databases.
This particular Powerstore is a single appliance and not clustered. It is block optimized. And configured for single-drive failure resiliency.
The Powerstore interface is easy and straightforward. Much of the complexity of block storage provisioning of the past has been removed or greatly streamlined.
To create new ASM disks, first we navigate to Storage on the main menu. Once in the Storage menu, select Create.
The Create screen allows us to name our new volumes. The Powerstore refers the term volume in the same way as older VNX era systems used LUN. For us DBAs however, we can think of them as disks.
In this example I am naming my volumes O2ASMFRA which to me means; “disks for the ASM +FRA diskgroup on the Oracle2 server”.
I am also telling the Powerstore to create four volumes of 2TB. At this point there is no Volume Group or Protection Policy. We’ll come to those in a later post. For Performance Policy I have selected Medium.
There is no tiering in the conventional sense on Powerstore. And there is no option to select a RAID protection level. The Performance Policy can set to Low, Medium or High. If the system is under load, the Powerstore will prioritize volumes with a Performance Policy of High over Medium or Low. And volumes with a Performance Policy of Medium will be prioritized over Low.

Clicking Next takes us to the volume-mapping screen. Here we get to decide which hosts or clusters will be able to see our new volumes. I have selected my VMware ESX cluster Cluster1.
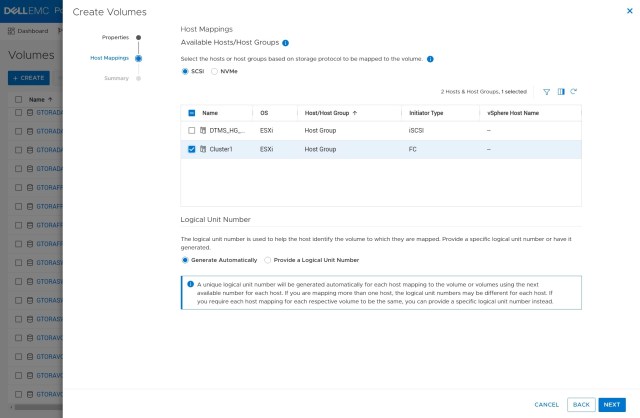
A final summary screen let’s us check if everything looks right:

The Powerstore shows us that it will create four volumes named O2ASMFRA-001 through O2ASMFRA-004 and they will be created on D40-appliance-1. As we only have a single appliance Powerstore and not a cluster this is the only placement choice. If we had a cluster, then the create menu would suggest a placement of our new volumes but also allow to chose another location.
If we think everything looks good then we can click Create.
The next task is to add these volumes to our server. If we were running bare metal we could simply issue the Linux command to rescan the SCSI bus:
[root@Oracle2 ~]# for myhost in $(ls /sys/class/scsi_host); do echo "- - -" > /sys/class/scsi_host/$myhost/scan; done
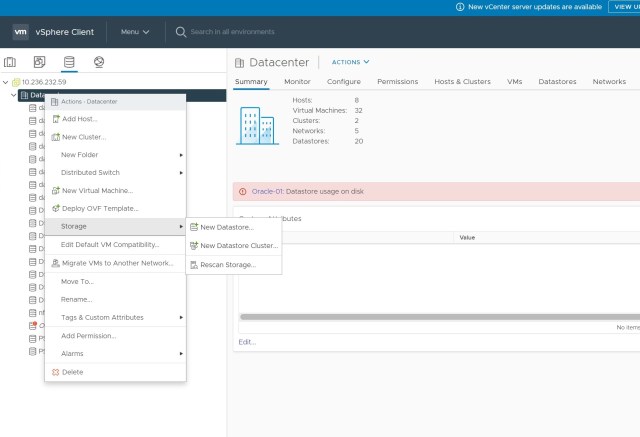
But this is a VMware environment, so we need to make ESX aware of our new volumes. Navigate to vCenter and then select the storage icon. Right click and select Storage, then Rescan Storage.
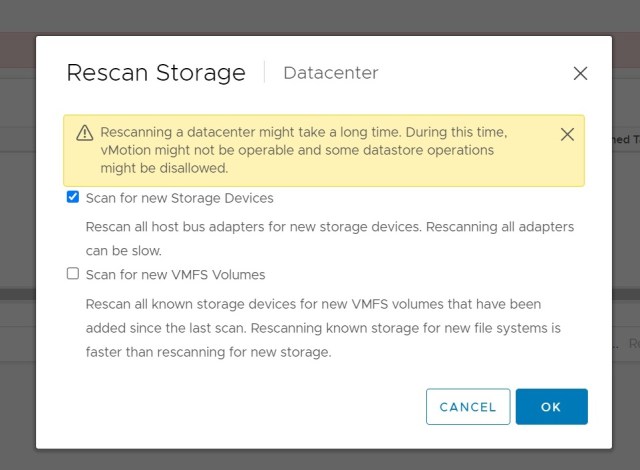
The Rescsan Storage dialog brings up a list of tasks. We can proceed with all of them, but we can save some time by de-selecting Scan for new VMFS volumes, as these are blank disks for use by ASM.
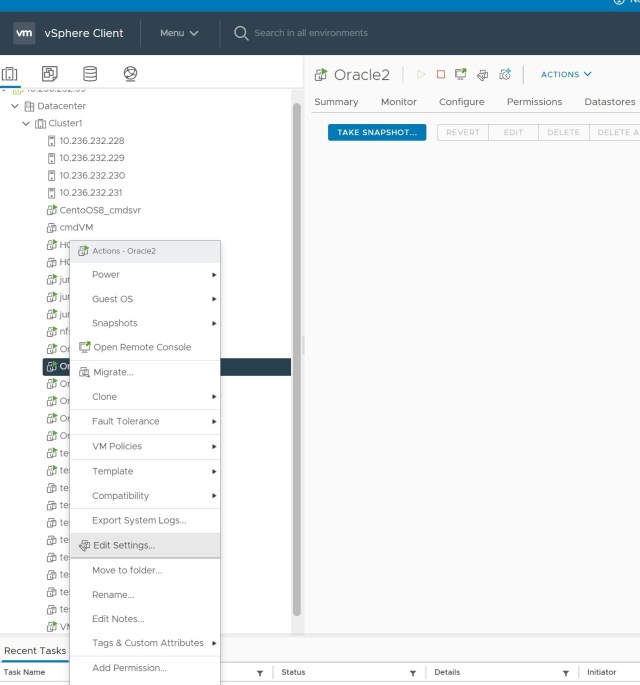
Once the rescan job has completed, we can add our new volumes to our virtualized server. Move to the list of guest VMs and select the server we want to add our new disks to. Then right-click and select Edit Settings.
Our new volumes could be added as a VMFS datastore and used as VMDK disks. Or they could be added as vVols. But in this example I am going to use RDMs. There are pros and cons to each option so pick the option that works best for you, but RDMs have the advantage of allowing all of the features and functions of the underlying storage to be used and they behave exactly like volumes in a bare metal environment which can be an advantage if you have a mix of virtual and non-virtual hosts.

Select Add New Device and then RDM Disk. This brings up the Select Target LUN menu where vCenter lists all of the disks it knows about that have not already been consumed by VMFS or attached to a guest VM.
In our example we know we just added four new 2TB volumes, and these are the only 2TB volumes visible from the select LUN menu. But in real production environments this might not be the case.
To ensure we have the right volumes, we can expand the Path ID and see the volumes’ WWN.
Moving back to the Powerstore interface, we can list our volumes and add the WWN from the Show/Hide Columns option.

Now we can see that our four new volumes are WWN IDs:
68ccf0980052c7e36caccdb2f089b7d5
68ccf09800e227076e3f06f725215c12
68ccf09800a85b4cc3ada83fec67c30f
68ccf098005083131d5422bc7950461a
When we examine the Path ID of the volume vCenter has offered us, we can confirm it is one our four new volumes, so click OK to add it as an RDM.
Repeat this process with the remaining three volumes, and then adjust the setting of each new volume so that each sits on a different SCSI controller. This will help ensure maximum performance by aggregating IO across all available adapters. Although this is less important for an FRA, it is still good practice when we have multiple volumes.

With the four new RDMs added, click OK to complete the process. vCenter should now report it has reconfigured the VM. We can now log into our guest VM as root.
The following Linux command will show us our SCSI devices, including the WWN ID and the size:
[root@Oracle2 ~]# lsscsi --wwn --size | sort -k 4
[6:0:0:0]    cd/dvd                                  /dev/sr0        -
[0:0:0:0]    disk                                    /dev/sda    107GB
[0:0:1:0]    disk    0x68ccf098008b5fa3d40171b9c176c4ff  /dev/sdb   1.09TB
[2:0:0:0]    disk    0x68ccf09800ae0a783b905d46b1e97050  /dev/sdc   1.09TB
[3:0:0:0]    disk    0x68ccf09800a306d6757fd6075b04a290  /dev/sdd   1.09TB
[1:0:0:0]    disk    0x68ccf098000f484b2bcb2d63de01348e  /dev/sde   1.09TB
[0:0:2:0]    disk    0x68ccf09800f0fdc3bc0231bfe5c477ab  /dev/sdf    858GB
[2:0:1:0]    disk    0x68ccf09800d81071101702747e6c144f  /dev/sdg    858GB
[3:0:1:0]    disk    0x68ccf09800628b451514d31c95288787  /dev/sdh    858GB
[0:0:3:0]    disk    0x68ccf09800aeea2e11f5eb12a687e11c  /dev/sdi   2.19TB
[1:0:1:0]    disk    0x68ccf098009f6142de84b1c1f4f40183  /dev/sdj    858GB
[0:0:4:0]    disk    0x68ccf0980052c7e36caccdb2f089b7d5  /dev/sdk   2.19TB
[2:0:2:0]    disk    0x68ccf098005083131d5422bc7950461a  /dev/sdl   2.19TB
[3:0:2:0]    disk    0x68ccf09800e227076e3f06f725215c12  /dev/sdm   2.19TB
[1:0:2:0]    disk    0x68ccf09800a85b4cc3ada83fec67c30f  /dev/sdn   2.19TB
[root@Oracle2 ~]#
We can see that devices sdk, sdl, sdm and sdn map to our four new volumes.
We need to manage device permissions and names. Some DBAs chose to use ASMLib for this task whereas others might choose to use ASM Filter Drivers. I prefer to use UDEV rules for a few reasons, but any of these options will work.
I use a helper script to create the rules for me:
[root@Oracle2 ~]# ./cr_udev.sh -d FRA -l sdd,sdg,sdl,sdm -o grid -g asmadmin
KERNEL=="sd*", SUBSYSTEM=="block", PROGRAM="/usr/lib/udev/scsi_id -g -u -d /dev/%k", RESULT=="368ccf0980052c7e36caccdb2f089b7d5", SYMLINK+="oracleasm/FRA00", OWNER="grid", GROUP="asmadmin", MODE="0660"
KERNEL=="sd*", SUBSYSTEM=="block", PROGRAM="/usr/lib/udev/scsi_id -g -u -d /dev/%k", RESULT=="368ccf09800a85b4cc3ada83fec67c30f", SYMLINK+="oracleasm/FRA01", OWNER="grid", GROUP="asmadmin", MODE="0660"
KERNEL=="sd*", SUBSYSTEM=="block", PROGRAM="/usr/lib/udev/scsi_id -g -u -d /dev/%k", RESULT=="368ccf09800e227076e3f06f725215c12", SYMLINK+="oracleasm/FRA02", OWNER="grid", GROUP="asmadmin", MODE="0660"
KERNEL=="sd*", SUBSYSTEM=="block", PROGRAM="/usr/lib/udev/scsi_id -g -u -d /dev/%k", RESULT=="368ccf098005083131d5422bc7950461a", SYMLINK+="oracleasm/FRA03", OWNER="grid", GROUP="asmadmin", MODE="0660"
These rules need to be added to a UDEV rules file in /etc/udev/rules.d I prefer to keep one rules file for each ASM diskgroup as I find this makes maintenance simpler. In this case the file will be 99-oracleasm_fra.rules
Reload the UDEV rules with:
[root@Oracle2 ~]# /sbin/udevadm control --reload-rules; /sbin/udevadm trigger
And then check the contents of /dev/oracleasm:
[root@Oracle2 ~]# ls -al /dev/oracleasm
total 0
drwxr-xr-x.  2 root root  280 Oct 28 15:24 .
drwxr-xr-x. 20 root root 3840 Oct 28 15:20 ..
lrwxrwxrwx.  1 root root    6 Oct 28 15:24 DATA00 -> ../sdb
lrwxrwxrwx.  1 root root    6 Oct 28 15:24 DATA01 -> ../sdc
lrwxrwxrwx.  1 root root    6 Oct 28 15:24 DATA02 -> ../sdd
lrwxrwxrwx.  1 root root    6 Oct 28 15:24 DATA03 -> ../sde
lrwxrwxrwx.  1 root root    6 Oct 28 15:24 FRA00 -> ../sdk
lrwxrwxrwx.  1 root root    6 Oct 28 15:24 FRA01 -> ../sdl
lrwxrwxrwx.  1 root root    6 Oct 28 15:24 FRA02 -> ../sdm
lrwxrwxrwx.  1 root root    6 Oct 28 15:24 FRA03 -> ../sdn
lrwxrwxrwx.  1 root root    6 Oct 28 15:24 SWINGDATA00 -> ../sdf
lrwxrwxrwx.  1 root root    6 Oct 28 15:24 SWINGDATA01 -> ../sdg
lrwxrwxrwx.  1 root root    6 Oct 28 15:24 SWINGDATA02 -> ../sdh
lrwxrwxrwx.  1 root root    6 Oct 28 15:24 SWINGDATA03 -> ../sdj
We now have four new disks named FRA00, FRA01, FRA02 and FRA03.
It is now a simple task to connect to the grid user and create our ASM diskgroup. We could use asmca in graphical mode, or we can use the command line option instead:
[grid@Oracle2 ~]$ asmca -silent -createDiskGroup -diskString /dev/oracleasm -diskGroupName FRA -diskList /dev/oracleasm/FRA00,/dev/oracleasm/FRA01,/dev/oracleasm/FRA02,/dev/oracleasm/FRA03 -redundancy EXTERNAL -au_size 4

[DBT-30001] Disk groups created successfully. Check /u01/app/19.0.0/grid_base/cfgtoollogs/asmca/asmca-211028PM032932.log for details.

Pingback: Creating a Storage Snapshot of an Oracle database using Dell Powerstore | the gruffdba