
Storage level snapshot are an incredibly fast and space efficient method to create usable clones of an Oracle database. In this post we’ll create a storage-level snapshot of a Oracle database using a Dell Powerstore storage array. Our database spans two ASM diskgroups, and will be mounted to a second server.
Note: There is a video of this post.
Storage snapshots have been around a long time now. There are numerous methods used to create and maintain them, and a detailed description is beyond the scope of this post. As a DBA, I think they are best described as a storage version of keeping changed database blocks in the UNDO tablespace. The UNDO tablespaces allows queries and transactions to see the data as it was for a given SCN, even if it was subsequently changed. UNDO doesn’t need to keep the whole table – just the changed blocks.
Snapshots offer a similar concept but for storage volumes. By simply keep track of changed blocks, we are able to recreate the entire state of a disk – or diskgroup – at a given point in time. And since the percentage of blocks that changes in a database is typically less than ten percent, we can offer this ability for remarkably little capacity invested.
Powerstore offers us the ability to create snapshots and thin clones of our database volumes. In some storage solutions – for example PowerFlex – a snapshot of a volume can be directly mapped to a target host and mounted as any other volume. In Powerstore a snapshot cannot be directly mounted. A thin clone can. A thin clone is created from a snapshot which may be explicit or implicit. This will be covered in this post.
First, let’s navigate to the Volumes screen of the Powerstore interface.
In our example I want to make a thin clone of my Swingbench database which is on Oracle1. And I want to mount that thin clone to my Oracle2 server.
My Swingbench database is primarily sitting on an ASM diskgroup called +SWINGDATA. And +SWINGDATA is comprised of four ASM disks. We can see them here in our Powerstore interface.

You can also see that we cannot create a thin clone of our four disks as Powerstore will not let us create a thin clone if more than one source volume is selected. We could thin-clone them individually, but that would result in a corrupt ASM diskgroup.
To be able to thin-clone more than one volume at once we need to create a Volume Group.
Click on Storage and then Volume Groups, and then use the Create button.
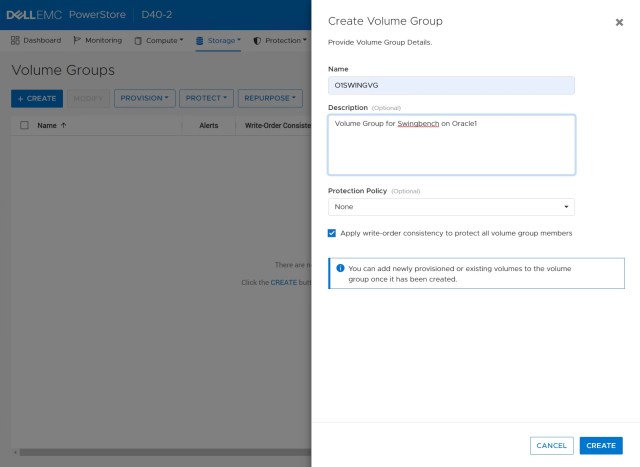
In this screen we can give our new Volume Group a name and a description. I have named my volume group O1SWINGVG.
We’ll leave the Protection Policy blank for now, but we do need to ensure that Apply write-order consistemcy to protect all volume group members is checked.
Write Order Consistency, sometimes called Write Order Fidelity, or just Write-Ordering, ensures that all writes are flushed to all members of a volume group in the exact same order as Oracle wrote them. Oracle is an ACID compliant database and is remarkable resilient to failures. A key mechanism of this resiliency is the redo log mechanism that enables a database to recover from a crash or failure. But for the recovery mechanism to work, Oracle must find that all writes that were completed before the current SCN listed in the control files do in fact exist in the redo or archive logs. Write ordering guarantees this.
Once the new Volume Group is created, we can add volumes to it.
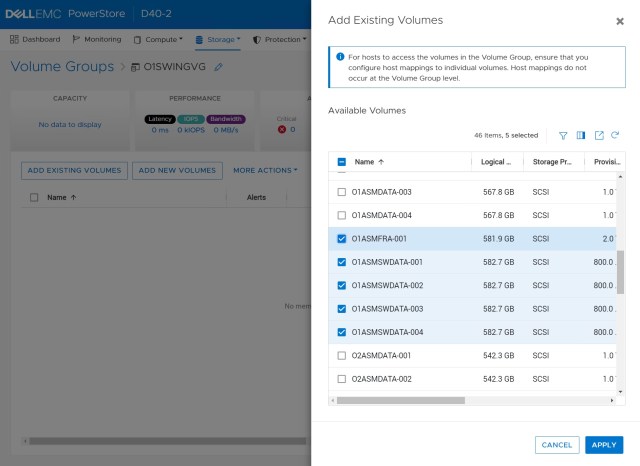
In our example we are going to add all of the volumes of the +SWINGDATA ASM diskgroup. And I am also going to add the single volume that is the +FRA diskgroup for Oracle1.
I have included the FRA diskgroup here because my Swingbench database has control files on both +SWINGDATA and +FRA. I could of course move those control files to another ASM diskgroup if I chose to, and if I was doing this on a real production system I probably would since +FRA is usually shared between multiple databases, but here in my lab I am just going to add +FRA into the volume group as well.
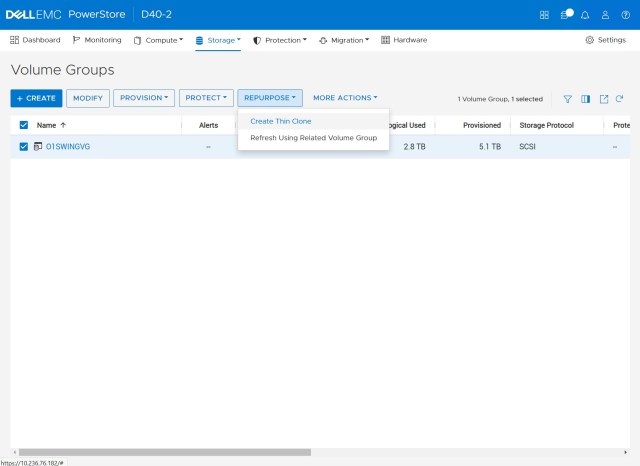
Now that I have all of the disks of +SWINGDATA and +FRA in the volume group, I can create a snapshot. But I can also save myself a step and select Repurpose followed by Create Thin Clone.
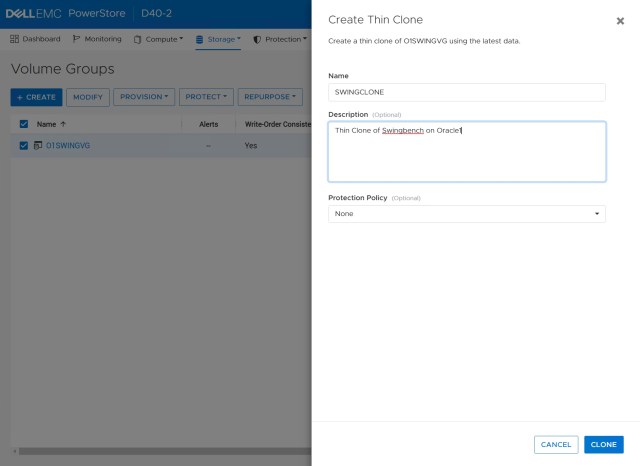
Next I can name my thin clone, so I’ll call it SWINGCLONE. And I’ll give it a description too.
I could assign a Protect Policy to my thin clone, which would enable me to specify regular snapshots of my thin clone, should I need to protect it in that manner. For now though we’ll leave that blank.
Note: When we created this thin clone we did NOT place the source database into hot backup mode. Our thin clone therefore is crash consistent (sometimes called crash restartable). Oracle will treat the thin clone exactly as if you had walked up to your database server and yanked out the power. The clone will likely require instance-level recovery which Oracle will handle automatically.
We certainly could have put our source database into hot backup mode before we make the thin clone. Such a thin clone is then referred to as application consistent and may be the better choice if the database has a high rate of change.
Oracle has published its support for crash consistent snapshots in MOS note 604683.1
With our thin clone created we now need to map it to a host or cluster.
We’ll map it to our VMware cluster Cluster1. If this was a bare metal environment we could just rescan the SCSI bus to see the new volumes, and then add them to whatever MPIO solution we had. In my environment through I am using VMware.

Moving to vCenter we need to rescan the HBAs of the ESX hosts to see the new thin-clone volumes. We can skip scanning for new VMFS volumes as this is not needed for what we are doing.
Next we will add the thin-clone volumes to the Oracle2 VM. As with regular volumes, we will use Edit Settings->Add New Device->RDM Disk and then select our thin clone volumes from the list presented. Again we can expand out the Path ID to see the WWN of the volume being added, and compare that to the WWN of the thin clone volumes in Powerstore, to make sure we are adding the right volumes from the list.
NB. If you want to see a full description of adding ASM disks from Powerstore, see the following blog post:
Create ASM diskgroups with Powerstore
Next we will log into our Oracle2 VM as root and check for the new disks.
The current contents of /dev/oracleasm is as follows:
[root@Oracle2 ~]# ls -al /dev/oracleasm
total 0
drwxr-xr-x. 2 root root 220 Oct 21 20:07 .
drwxr-xr-x. 20 root root 3920 Oct 25 18:57 ..
lrwxrwxrwx. 1 root root 6 Oct 21 20:09 DATA00 -> ../sdb
lrwxrwxrwx. 1 root root 6 Oct 25 18:57 DATA01 -> ../sdc
lrwxrwxrwx. 1 root root 6 Oct 21 20:09 DATA02 -> ../sdd
lrwxrwxrwx. 1 root root 6 Oct 21 20:09 DATA03 -> ../sde
lrwxrwxrwx. 1 root root 6 Oct 25 18:57 FRA00 -> ../sdi
lrwxrwxrwx. 1 root root 6 Oct 25 18:03 SWINGDATA00 -> ../sdf
lrwxrwxrwx. 1 root root 6 Oct 25 18:03 SWINGDATA01 -> ../sdg
lrwxrwxrwx. 1 root root 6 Oct 25 18:57 SWINGDATA02 -> ../sdh
lrwxrwxrwx. 1 root root 6 Oct 25 18:03 SWINGDATA03 -> ../sdj
Devices sdb through sdj are currently being used by the three existing diskgroups on this server. This database server already has a Swingbench database on it. And it already has both a +SWINGDATA and an +FRA diskgroup. We will need to mount our thin clone but also rename our diskgroups to avoid conflict.
Let’s look to see if we can see the new disks:
[root@Oracle2 ~]# for dev in $(lsscsi | grep PowerStore | cut -d"/" -f 3 | sort ); do sz=`lsblk | grep $dev | awk {'print $4'}`; wwn=`lsscsi --wwn | grep $dev | awk {'print $3'}`; echo $dev $sz $wwn; done
sdb 1T 0x68ccf098008b5fa3d40171b9c176c4ff
sdc 1T 0x68ccf09800ae0a783b905d46b1e97050
sdd 1T 0x68ccf09800a306d6757fd6075b04a290
sde 1T 0x68ccf098000f484b2bcb2d63de01348e
sdf 800G 0x68ccf09800f0fdc3bc0231bfe5c477ab
sdg 800G 0x68ccf09800d81071101702747e6c144f
sdh 800G 0x68ccf09800628b451514d31c95288787
sdi 2T 0x68ccf09800aeea2e11f5eb12a687e11c
sdj 800G 0x68ccf098009f6142de84b1c1f4f40183
sdk 800G 0x68ccf09800538c0b96fee9b7ffb05e99
sdl 800G 0x68ccf09800549f1304aac879a05387e6
sdm 800G 0x68ccf09800b58ee45418a94dd98573c0
sdn 800G 0x68ccf098006f1e2cde2718afe571419b
sdo 2T 0x68ccf09800f96f5eac023d23e57b1000
So we can see that there are devices sdk through sdo. Five new devices. And the sizes match what we expected to see from our source +SWINGDATA and +FRA diskgroups. Again we can check these WWN IDs against Powerstore.
I will use the cr_udev.sh script to generate new UDEV rules for the new thin clone devices. If the source system used ASMLib then the original disk names would still be present, and the DBA would have to use <em>oracleasm force-renamedisk</em> to assign a new name and avoid conflict with an existing ASM disk of the same name.
Since we are not using ASMLib we do not have that problem:
[root@Oracle2 ~]# ./cr_udev.sh -d CLONESWINGDATA -g asmadmin -o grid -l sdk,sdl,sdm,sdn
KERNEL=="sd*", SUBSYSTEM=="block", PROGRAM="/usr/lib/udev/scsi_id -g -u -d /dev/%k", RESULT=="368ccf09800538c0b96fee9b7ffb05e99", SYMLINK+="oracleasm/CLONESWINGDATA00", OWNER="grid", GROUP="asmadmin", MODE="0660"
KERNEL=="sd*", SUBSYSTEM=="block", PROGRAM="/usr/lib/udev/scsi_id -g -u -d /dev/%k", RESULT=="368ccf09800549f1304aac879a05387e6", SYMLINK+="oracleasm/CLONESWINGDATA01", OWNER="grid", GROUP="asmadmin", MODE="0660"
KERNEL=="sd*", SUBSYSTEM=="block", PROGRAM="/usr/lib/udev/scsi_id -g -u -d /dev/%k", RESULT=="368ccf09800b58ee45418a94dd98573c0", SYMLINK+="oracleasm/CLONESWINGDATA02", OWNER="grid", GROUP="asmadmin", MODE="0660"
KERNEL=="sd*", SUBSYSTEM=="block", PROGRAM="/usr/lib/udev/scsi_id -g -u -d /dev/%k", RESULT=="368ccf098006f1e2cde2718afe571419b", SYMLINK+="oracleasm/CLONESWINGDATA03", OWNER="grid", GROUP="asmadmin", MODE="0660"
[root@Oracle2 ~]# ./cr_udev.sh -d CLONESWINGDATA -g asmadmin -o grid -l sdk,sdl,sdm,sdn > /etc/udev/rules.d/99-oracleasm_cloneswingdata.rules
[root@Oracle2 ~]# ./cr_udev.sh -d CLONEFRA -g asmadmin -o grid -l sdo > /etc/udev/rules.d/99-oracleasm_clonefra.rules
[root@Oracle2 ~]# /sbin/udevadm control --reload-rules; /sbin/udevadm trigger
Now let’s check /dev/oracleasm
[root@Oracle2 gct]# ls /dev/oracleasm
CLONEFRA00  CLONESWINGDATA00  CLONESWINGDATA01  CLONESWINGDATA02  CLONESWINGDATA03  DATA00  DATA01  DATA02  DATA03  FRA00  SWINGDATA00  SWINGDATA01  SWINGDATA02  SWINGDATA03
Next we need to rename the cloned ASM diskgroups to avoid conflict with the existing ones on Oracle2. Log in as the grid user, or whichever user owns the Grid Infrastructure.
ASM gives us a method to rename diskgroups with the renamedg tool:
[grid@Oracle2 ~]$ renamedg dgname=SWINGDATA newdgname=CLONESWINGDATA verbose=true check=true asm_diskstring='/dev/oracleasm/CLONESWINGDATA*'

Parameters in effect:

         Old DG name       : SWINGDATA
         New DG name          : CLONESWINGDATA
         Phases               :
                 Phase 1
                 Phase 2
         Discovery str        : /dev/oracleasm/CLONESWINGDATA*
         Check              : TRUE
         Clean              : TRUE
         Raw only           : TRUE
renamedg operation: dgname=SWINGDATA newdgname=CLONESWINGDATA verbose=true check=true asm_diskstring=/dev/oracleasm/CLONESWINGDATA*
Executing phase 1
Discovering the group
Performing discovery with string:/dev/oracleasm/CLONESWINGDATA*
Identified disk UFS:/dev/oracleasm/CLONESWINGDATA01 with disk number:1 and timestamp (33120333 -577353728)
Identified disk UFS:/dev/oracleasm/CLONESWINGDATA02 with disk number:3 and timestamp (33120333 -577353728)
Identified disk UFS:/dev/oracleasm/CLONESWINGDATA03 with disk number:2 and timestamp (33120333 -577353728)
Identified disk UFS:/dev/oracleasm/CLONESWINGDATA00 with disk number:0 and timestamp (33120333 -577353728)
Checking for hearbeat...
Re-discovering the group
Performing discovery with string:/dev/oracleasm/CLONESWINGDATA*
Identified disk UFS:/dev/oracleasm/CLONESWINGDATA01 with disk number:1 and timestamp (33120333 -577353728)
Identified disk UFS:/dev/oracleasm/CLONESWINGDATA02 with disk number:3 and timestamp (33120333 -577353728)
Identified disk UFS:/dev/oracleasm/CLONESWINGDATA03 with disk number:2 and timestamp (33120333 -577353728)
Identified disk UFS:/dev/oracleasm/CLONESWINGDATA00 with disk number:0 and timestamp (33120333 -577353728)
Checking if the diskgroup is mounted or used by CSS
Checking disk number:1
Checking disk number:3
Checking disk number:2
Checking disk number:0
Generating configuration file..
Completed phase 1
Executing phase 2
Looking for /dev/oracleasm/CLONESWINGDATA01
Leaving the header unchanged
Looking for /dev/oracleasm/CLONESWINGDATA02
Leaving the header unchanged
Looking for /dev/oracleasm/CLONESWINGDATA03
Leaving the header unchanged
Looking for /dev/oracleasm/CLONESWINGDATA00
Leaving the header unchanged
Completed phase 2
In our example we are changing the diskgroup SWINGDATA for CLONESWINGDATA. But we are limiting the tool to looking at disks /dev/oracleasm/CLONESWINGDATA*. This means that the existing SWINGDATA diskgroup is unaffected as its disks do not match this criteria.
The check=true flag tells renamedg to check if the diskgroup can be renamed, but not actually to do anything. This allows to check that it finds four disks, and they are not mounted or in use. This helps us avoid costly mistakes by accidentally renaming the wrong diskgroup. In this example everything looks good so we can exeute the command again changing check=true for check=false
We will then repeat this operation for the thin clone of FRA, which we will rename to CLONEFRA.
An optional step at this point is to rename the individual disks of the diskgroup. This is not necessary but can help avoid confusion. Let’s mount the CLONESWINGDATA diskgroup using SQL*Plus:
SQL> alter diskgroup CLONESWINGDATA mount restricted;
Diskgroup altered.

SQL> @show_asm_disks.sql

DISK_NAME                 DISKGROUP_NAME       DISK_NUMBER   TOTAL_MB PATH
------------------------- -------------------- ----------- ---------- --------------------------------------------------
                          CLONEFRA                       0          0 /dev/oracleasm/CLONEFRA00
SWINGDATA_0000            CLONESWINGDATA                 0     819200 /dev/oracleasm/CLONESWINGDATA00
SWINGDATA_0001            CLONESWINGDATA                 1     819200 /dev/oracleasm/CLONESWINGDATA01
SWINGDATA_0002            CLONESWINGDATA                 2     819200 /dev/oracleasm/CLONESWINGDATA03
SWINGDATA_0003            CLONESWINGDATA                 3     819200 /dev/oracleasm/CLONESWINGDATA02
DATA_0000                 DATA                           0    1048576 /dev/oracleasm/DATA00
DATA_0001                 DATA                           1    1048576 /dev/oracleasm/DATA01
DATA_0002                 DATA                           2    1048576 /dev/oracleasm/DATA02
DATA_0003                 DATA                           3    1048576 /dev/oracleasm/DATA03
FRA_0000                  FRA                            0    2097152 /dev/oracleasm/FRA00
SWINGDATA_0000            SWINGDATA                      0     819200 /dev/oracleasm/SWINGDATA00
SWINGDATA_0001            SWINGDATA                      1     819200 /dev/oracleasm/SWINGDATA01
SWINGDATA_0002            SWINGDATA                      2     819200 /dev/oracleasm/SWINGDATA02
SWINGDATA_0003            SWINGDATA                      3     819200 /dev/oracleasm/SWINGDATA03
You can see here that the diskgroup CLONESWINGDATA has four disks, but they are still named SWINGDATA_0000 through SWINGDATA_0003. To change this we can use:
SQL> alter diskgroup CLONESWINGDATA rename disks all;
Diskgroup altered.
NB: You can only rename ASM disks in this fashion when the diskgroup is mounted RESTRICTED.
Repeat the same operation for CLONEFRA. Once all disks are renamed, dismount both disk groups, and then mount them again, this time without the RESTRICTED option.
Now we have a thin-clone of Swingdata from Oracle1, comprised of two newly renamed diskgroups – CLONESWINGDATA and CLONEFRA – which are mounted to Oracle2.
In the next blog post, we will mount the thin clone database and open it.
