
In a few recent posts and videos I’ve walked through creating a thin clone of an Oracle database using a Dell Technologies Powerstore.
In this post, we’ll walk through how to safely delete an Oracle database that was created using a Powerstore snapshot or thin-clone.
There is a video for this blog.
This post builds on the previous posts on using snapshots and thin clones with a Dell Technologies Powerstore. As such the clone database clonedb is a thin clone of a Swingbench database. The clone is mounted and open on the Oracle2. The cloned ASM diskgroups were SWINGDATA and FRA, but they were renamed to CLONESWINGDATA and CLONEFRA. The thin clone was mapped to the Oracle2 VM as RDMs
Job one is to shut down and delete the clone database. Although I stated in the post on creating the clone database to NOT use dbca as it would create data files we didn’t want. In this scenario I am going to recommend you do use dbca as it will delete all the files of the clone database.
One might ask why this is necessary since we are going to delete the snapshot or thin clone anyway. The answer is that if our cloned database has been used for any length of time, it is entirely possible additional data files, temp file or even redo log files have been added. And whomsoever added them might not have used the expected ASM diskgroups. This approach ensures that all of the data files associated with our clone are deleted. Wherever they are.
[oracle@Oracle2 ~]$ dbca -silent -deleteDatabase -sourceDB clonedb -sysDBAUserName sys -sysDBAPassword oracle
[WARNING] [DBT-19202] The Database Configuration Assistant will delete the Oracle instances and datafiles for your database. All information in the database will be destroyed.
Prepare for db operation
32% complete
Connecting to database
35% complete
39% complete
42% complete
45% complete
48% complete
52% complete
65% complete
Updating network configuration files
68% complete
Deleting instance and datafiles
84% complete
100% complete
Database deletion completed.
Look at the log file "/u01/app/oracle/cfgtoollogs/dbca/clonedb_clonedb/clonedb_clonedb0.log" for further details.
The dbca tool can take a while to complete. Especially for a large database or a database with many files. Nonetheless I believe this is a worth while step.
Once dbca has completed we should verify that the INIT.ORA and spfiles havee been removed from the $ORACLE_HOME/admin/dbs directory, and that the entry has been removed from the oratab file.
The dbca tools does NOT delete the admin dump directories, so we can delete those manually:
[oracle@Oracle2 ~]$ rm -Rf $ORACLE_BASE/admin/clonedb
Next we need to delete and drop the cloned ASM diskgroups.
Log in as the owner of ASM. In my example this is the grid user.
We will use asmca to delete the drop the CLONESWINGDATA and CLONEFRA diskgroups.
[grid@Oracle2 ~]$ srvctl stop diskgroup -g CLONESWINGDATA
[grid@Oracle2 ~]$ srvctl disable diskgroup -g CLONESWINGDATA
[grid@Oracle2 ~]$ srvctl status diskgroup -g CLONESWINGDATA -a
Disk Group CLONESWINGDATA is not running
Disk Group CLONESWINGDATA is disabled
[grid@Oracle2 ~]$ srvctl remove diskgroup -g CLONESWINGDATA -f
[grid@Oracle2 ~]$ asmcmd dropdg -r -f CLONESWINGDATA

[grid@Oracle2 ~]$ srvctl stop diskgroup -g CLONEFRA
[grid@Oracle2 ~]$ srvctl disable diskgroup -g CLONEFRA
[grid@Oracle2 ~]$ srvctl status diskgroup -g CLONEFRA -a
Disk Group CLONEFRA is not running
Disk Group CLONEFRA is disabled
[grid@Oracle2 ~]$ srvctl remove diskgroup -g CLONEFRA -f
[grid@Oracle2 ~]$ asmcmd dropdg -r -f CLONEFRA
Again, as we are about to drop the thin clones anyway, this multi-step approach might appear overly tedious. But it serves two important needs.
Firstly we need to make sure no other database has created files on the cloned diskgroups. ASM will not allow us to dismount a diskgroup that is actively being used.
Secondly it also serves to expunge all details of the cloned diskgroups from the target host. This will reduce the possibility of problems occurring if we ever want to recreate the clone in the future on this same host.
If all of the above completes without a problem, we need to log in as root.
As root we can check the contents of /dev/oracleasm
[root@Oracle2 ~]# ls -al /dev/oracleasm
total 0
drwxr-xr-x.  2 root root  320 Oct 25 19:04 .
drwxr-xr-x. 20 root root 3920 Oct 25 18:57 ..
lrwxrwxrwx.  1 root root    6 Oct 25 21:37 CLONEFRA00 -> ../sdo
lrwxrwxrwx.  1 root root    6 Oct 25 21:38 CLONESWINGDATA00 -> ../sdk
lrwxrwxrwx.  1 root root    6 Oct 25 21:38 CLONESWINGDATA01 -> ../sdl
lrwxrwxrwx.  1 root root    6 Oct 25 21:38 CLONESWINGDATA02 -> ../sdm
lrwxrwxrwx.  1 root root    6 Oct 25 21:38 CLONESWINGDATA03 -> ../sdn
lrwxrwxrwx.  1 root root    6 Oct 25 21:29 DATA00 -> ../sdb
lrwxrwxrwx.  1 root root    6 Oct 25 21:36 DATA01 -> ../sdc
lrwxrwxrwx.  1 root root    6 Oct 25 21:29 DATA02 -> ../sdd
lrwxrwxrwx.  1 root root    6 Oct 25 21:29 DATA03 -> ../sde
lrwxrwxrwx.  1 root root    6 Oct 25 21:36 FRA00 -> ../sdi
lrwxrwxrwx.  1 root root    6 Oct 25 21:30 SWINGDATA00 -> ../sdf
lrwxrwxrwx.  1 root root    6 Oct 25 21:30 SWINGDATA01 -> ../sdg
lrwxrwxrwx.  1 root root    6 Oct 25 21:36 SWINGDATA02 -> ../sdh
lrwxrwxrwx.  1 root root    6 Oct 25 21:30 SWINGDATA03 -> ../sdj
The disks we need to delete are devices sdk, sdl, sdm sdn and sdo as these are the devices that are the ASM disks for CLONESWINGDATA and CLONEFRA.
We can examine the WWN IDs of the disks as follows:
for dev in $(lsscsi | grep PowerStore | cut -d"/" -f 3 | sort); do sz=`lsblk | grep $dev |  awk {'print $4'}`; wwn=`lsscsi --wwn | grep $dev | awk {'print $3'}`; echo $dev $sz $wwn; done


sdk 800G 0x68ccf09800538c0b96fee9b7ffb05e99
sdl 800G 0x68ccf09800549f1304aac879a05387e6
sdm 800G 0x68ccf09800b58ee45418a94dd98573c0
sdn 800G 0x68ccf098006f1e2cde2718afe571419b
sdo 2T   0x68ccf09800f96f5eac023d23e57b1000
In this example we are using VMware. If this was a bare metal install, we could delete the thin clone in Powerstore and then delete the UDEV rules and we would be done. But VMware makes this somewhat more complicated.
Taking the WWN IDs shown above, we need to find these disks in vCenter. Find the guest VM and then use Edit Settings to list the virtual hardware. In this example we can see that Hard Disk 15 has a WWN that matches device sdo.
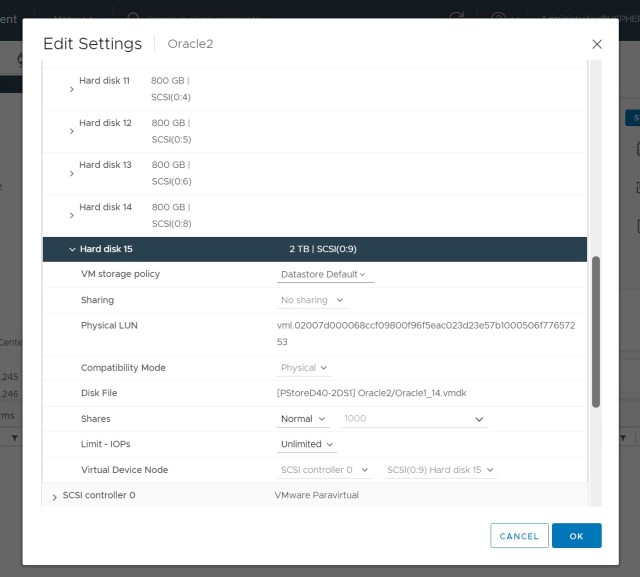
Having found the correct disk, check the box to remove the disk and also check the box Delete files from datastore. Even though RDMs are not virtual disks, each RDM creates a small mapping file that is stored on VMFS. This needs to be deleted as we plan to delete the thin clone.

Repeat this process until all five disks have been removed from the VM. Then click OK to reconfigure the VM.

Next we can move to the Powerstore interface. Click on Volume Groups and find the thin clone in the list. In my example I named it SWINGCLONE. Highlight the thin clone and select Provision and then Unmap.
The Powerstore interface will ask us to confirm the host and or clusters we want to unmap the thin clone from.
Once the thin clone is unmapped it is a good idea to rescan the HBAs in vCenter, and then confirm the Oracle server is still up and running, and the other ASM diskgroups are online. At this point we have not actually deleted the thin clone so we could put everything back if we needed to.
If everything looks okay, we can use the Powerstore interface to delete the thin clone.
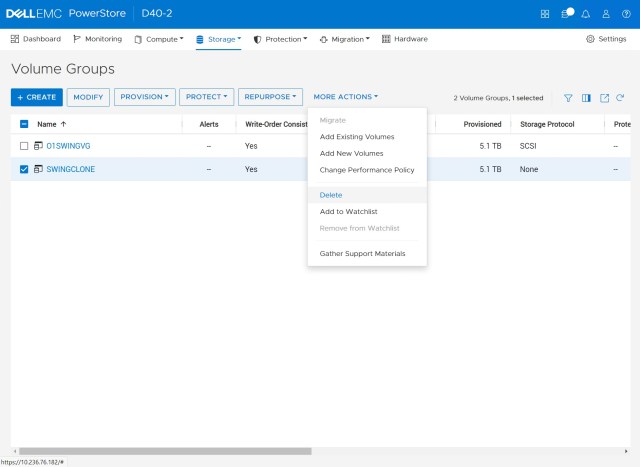
Powerstore’s thin clone is actually comprised of a volume group, and five snapshot volumes. We could delete the volume group and leave the volumes intact but we want to delete everything. Click DELETE to delete the thin clone and all the snapshot volumes associated with it.

